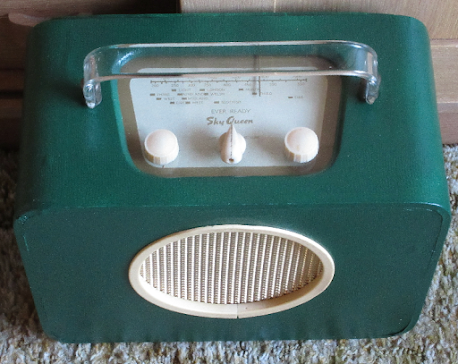
The Sky Queen from 1953 was a very drab looking affair similar to the HMV radio record player I also restored this year. They both had a textured Rexine finish that dirt would stick to the grain and no end of cleaning made them look better. But with a nice coat or two or even three of green paint, they take on a new life. No less lighter though I'm afraid, although the original batteries were 1/2 the weight of a car battery on top of the radio's own pull. Nether-the-less it was portable and the weight gave the speaker a nice tonal quality that no longer exists in plastic portables today.
The repair
I only paid £5 for her majesty, named I expect after the new Queen that had arrived on our throne at that time. The tin of paint cost me £6, but I have some left over for another project.
Just give you an idea how long this set has been waiting to be repaired, it still had an Exide 1950s DM536 duel voltage battery inside it? I brought it on line from Ian in Dudley, West Midlands, who ran a radio shop in the town centre along with his late father, he told me that when he closed the shop down he took all the radios home with him and now he's selling them.
I started by stripping the whole set down. The hinged door at the rear is held in place by 5 wood screws, three above and 2 below on the detachable base board. The loudspeaker and built in MW coiled aerial are held by 4 x 2 BA nuts and 2 solder wires to the aerial ands 2 to the speaker. The chassis is held by 2 wood screws either side to the baffle and 2 bolts holding the carry handle.
 |
Speaker/baffle and aerial all held by 4 nuts.
|
Once that was removed 2 rubber trims pulled away from and back, the real has a woven wicker air vent. The dial window is held by 8 tiny wood screw, best removed for cleaning and saves masking when spaying. I did the spaying outside on this job, when I did the previous HMV set spay went all over the carpet and items in my box storage room.
Once the chassis was out I extended the speaker and aerial wires and powered up the set. One 'D' type 1.5v battery is enough for the heater voltage and about 7 PP3's in series is enough to give HT, most valves will work as low as 30 v HT, but quieter than full 90 v.
The set uses the miniature low power drain DK,DM, etc type valves, I checked heater continuity on all valves first, they were fine, the sound output has a centre tap double heater, using 3 pins, make sure both elements are OK. Lots of wax capacitors were checking high values so I swapped them all, mainly HT decoupling capacitors that stop RF transfer to the HT rails causing whistles or instability.
 |
Arrows show doggy caps
|
Another nightmare with miniature valves is the holders, they were cheaply made and nearly always give trouble, order new ones if necessary, and make a good wiring diagram before removing.
I decided to add 2 LED's to Illuminate the tuning dial, wired in series with a 56k resistor across the HT rail. The tuning cable broke while I was repairing the set and that took me a few extra hours to re-string. I did a diagram for you but I can't find it, sorry. Rather than order expensive string on-line I used some model boat rigging string that I had lying around that seems quite string, time will tell, lol
 |
| I was ugly and only Mickey could save me |
I've included a photo of the set before restore and that's just reminded me that before I spayed it I glued lots of loose Rexine back down, mainly inside the cabinet, but you can see some above. A good clean with a tooth brush and washing up liquid is a must, if not the spay paint will be blotchy.


No comments:
Post a Comment